E-Mail Setup |
Previous Top Next |
Menu Navigation
Setup ... Application ... Optional Features ... E-Mail Accounts
Lists ... Human Resources ... Employee List
About E-Mail
In today's business world, e-mail is the preferred method of communication. ManageMore has incorporated e-mail functionality, woven right into our Customer Relationship Management and other business features. The program allows you to send and receive e-mail to and from customers, employees, vendors, personal and business contacts. You can also send customizable bulk e-mail to many recipients at one time for marketing, collections, or communication purposes. This topic will help you set up ManageMore's e-mail features.
In this Topic
Field by Field Help - E-Mail Account screen
Field by Field Help - Employee E-Mail Address screen
Related Topics
4.5 Email Manager
5.12 E-Mail
5.13 Bulk E-Mail
5.14 E-Mail Templates and Categories
5.15 E-Mail Removal
15.1 Employees
Internal E-Mail refers to e-mail sent from one employee to another from within ManageMore. This type of e-mail requires no email accounts, since internal e-mail does not use the internet. To allow an employee to receive internal mail, simply choose the option present on the employee screen.
E-Mail Pro is the underlying engine that drives many of the e-mail features of ManageMore. With E-Mail Pro, you will be able to utilize all of ManageMore's e-mail functionality, including internal e-mail, e-mail templates, receiving e-mail, and bulk e-mail. Without E-Mail Pro, you will only be able to send single external e-mail. If your license did not include E-Mail Pro, and you wish to add these features, please contact your sales representative.
External E-Mail refers to e-mail sent from within ManageMore to external recipients, and from external senders to internal recipients. This type of e-mail requires email accounts to be setup. To allow an employee to receive external mail, you must assign e-mail address(es) to the employee.
E-Mail Accounts are used to define the settings necessary to send and receive internet (external) e-mail. These settings (see Figure 3-3) are provided by your Internet Service Provider (ISP), and tell ManageMore to what mail server(s) it will connect to send and receive external mail. An e-mail account also contains the user name and password needed to access the mail servers. The e-mail account may be used by one or more employees to send and/or receive e-mail.
Employee E-Mail Addresses are used to identify e-mail which is sent from or received for a particular employee.
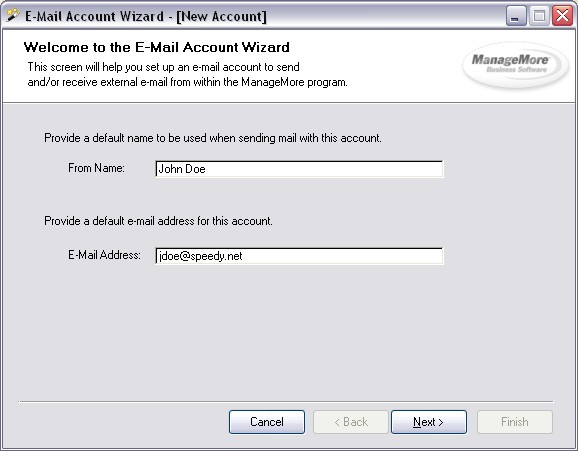
Figure 3-3. E-Mail Account Wizard Screen
To set up e-mail accounts in ManageMore, you must select Setup Optional Features, and choose the E-Mail section. First check the option to Allow sending/receiving of external mail, then select the E-Mail Accounts tab to add, edit or remove accounts.
Field by Field Help - E-Mail Account Wizard screen
From Name
The default name to be used on e-mails sent with this account.
E-Mail Address
The default e-mail address associated with this account.
Mail Server Settings
Incoming (POP3) Server
Enter the domain name of your incoming mail server (provided by your e-mail provider).
Incoming Authentication
Enter the user name and password needed to receive mail on this e-mail account.
This account is used for sending mail only
Check this box if you will not receive mail using this account. The fields above will be disabled upon selection.
Ougoing (SMTP) Server Name
Enter the name of your outgoing mail server (provided by your e-mail provider).
Outgoing Authentication
Select this option if your e-mail provider requires authentication to send mail. Provide a user name and password, if necessary.
Account Usage
If you have user employees setup in your ManageMore company, you will be prompted for the use of this account. The e-mail account may be used by a singe employee, or shared by multiple employees.
| Single Employee | If a single employee will use the account, enter or select the Employee Id of the employee assigned to the account. This employee will be the only employee to send and/or receive mail using this account. |
| Multiple Employees | Select this option to share the account among several employees. Select this option to allow multiple employees to send and/or receive e-mail using this account. The e-mail received may be shared among the employees as a group, or routed to a specific employee address mailbox. |
| Sharing e-mail received for common company e-mail addresses (e.g., sales@yourcompany.com) is a great way to handle communication from contacts among a group of related employees who deal with those contacts (e.g., sales reps) |
Employee E-Mail Addresses
In this tab you will define which employees will use the account, and how the employee will use the account.
New
Add a new employee address to this account.
Remove
Remove the highlighted address from the account.
(See the section below for more explanation on the employee e-mail address screen)
Final Options
Description
Enter a title used to identify the account within the program.
Advanced Options
Click this button to access advanced options for the account.
Advanced Options
SMTP Port
Enter the port to use when sending e-mail. The default port for sending mail is 25.
Use SSL when sending mail
Select this option to connect to the SMTP server using Secure Socket Layers (SSL).
POP3 Port
Enter the port to use when receiving e-mail. The default port for receiving mail is 110.
Use SSL when receiving mail
Select this option to connect to the POP3 server using Secure Socket Layers (SSL).
Timeout xx seconds
Enter the number of seconds to wait before reporting a timeout from the server. A value of zero indicates that the program will wait indefinitely.
Other Options (Single Employee)
Automatically respond to messages received
Select this option to automatically send a response when an e-mail is received using this account. You must select an e-mail template to use for the automatic response.
Private Account
Select this option to make this account private to the employee assigned. This option will ensure that the account is not available for assignment to other employees via the Update Employee screen.
Other Options (Multiple Employee)
Routing Header
Enter the header used to route the e-mail to the proper employee. This optional value is useful when using alias e-mail addresses assigned to the account, and your ISP or mail server adds the header to indicate the proper recipient of the e-mail. If entered, the program will search the applicable header value for the e-mail recipient's address.
Field by Field Help - Employee E-Mail Address screen
Use these settings to define the employees that will use the account, and the specific use for the employee.
Employee Id
Enter or select the employee that will use the account.
| In order to use the e-mail features, the selected employee must be defined as a user in the Security Administrator, capable of logging into the program. In addition, you may want to review pertinent employee specific settings on the e-mail tab of the update Employee screen. |
From Name
Enter the name to be used when sending mail using this address.
E-Mail Address
Enter or select the e-mail address to be sent and/or received. If an address other than the default address is selected, it must be forwarded to the account by your ISP.
Address Usage
| Group Mail (Shared Access) | Select this option to share e-mail received for this address among all employees assigned. The employees will all see the messages received in a special folder in their Organizer window. Messages will be marked with the employee's initials when a message is acted upon. You must also provide a name for the Group, which will be used as the Organizer folder name. |
| Send and Receive (Individual Access) | Select this option to route messages received to the individual's inbox. This option is only available for alternate (alias) addresses created on the account. |
| Send Only | Select this option for this address to be used for sending mail only. |
Advanced Options
Automatically respond to e-mail messages received with template
Select this check box to instruct the program to automatically respond to any incoming e-mail sent to the given address. Additionally, you will need to type in a template ID for the response e-mail or look it up using the lookup [...] button.
Account Owner
Select this option to make the selected employee the account owner. The account owner will be the default recipient in the case of a shared account with multiple addresses. If a recipient cannot be determined by the e-mail address, the mail will be delivered to the account owner.
| Q01. | Can I use the program to check my America Online e-mail account(s)? What about Hotmail, or other Web-based mail (e.g. Yahoo Mail, etc.)? |
| A01. | America Online (AOL) uses proprietary e-mail technology, and it cannot be integrated into other programs. Hotmail and Yahoo can be used as long as you have signed up for POP access with them. The best solution would be to sign up for a standard (POP) e-mail account with your ISP. |
| Q02. | Can I setup e-mail for internal use only? |
| A02. | Yes. Simply follow the instructions in this topic, but do not follow those that apply to external e-mail. Leave the option to turn on external e-mail off. |
| Q03. | Can I enter personal e-mail contacts without entering them as customer into the program? |
| A03. | Yes. Simply create a new e-mail and click on the To:, Cc:, or Bcc: buttons. Then change the Show Names From to Personal. Then click on the New Personal Contact button at the bottom left of the window. |
| Q04. | Where can I get my SMTP and/or POP server name? |
| A04. | Contact your ISP for the SMTP/POP server name you should use. |
| Q05. | Can I still use this feature if I have my own mail server? |
| A05. | Yes. You can use the e-mail functionality within ManageMore if you have your own e-mail server. Simply specify the address(es) / name(s) of your servers in the server name field(s). |
Q06. I don't see my question here. Where else can I get information?
A06. Visit our website's Technical Support section.
|
|
|
| © 2015 - Intellisoft Solutions, Inc. All rights reserved. | |
| Other Related Links | |
| Business Software | Cellular Software | Pager Software | Business Management Software |